Sunday, April 10, 2011

S is for sleepers?

As usual with my latest run of modelling there were a couple of lazy S trucks in the box of

"I don't model that era but I got it cheap!"

So when I came across some pictures of S trucks used in sleeper traffic I remembered my hidden treasures and found good use for them which brings them into my era. Better still they are way and works, which interests me due to individuality.


I cut a piece of balsa wood to shape of the the inside of the wagon. I scribed the sleeper width and put in notches to make it look as though the sleepers had not been cut to square.

I painted it brown and dry brushed it with a deep orange colour to give the impression of the clean grain from cutting and that they had weathered a lot from the time they were sawn to the day of pick up.


Individual sleepers were then cut from scale lumber. They will be applied to the top of the balsa pile. Again painted in the same manner as the balsa.

The Balsa load installed in the wagon. It isn't glued in so it can be removed if needed.


Top view.


SW 13288 with the individual sleepers glued in with white glue. After gluing them in I gave them a little extra streaking for appearance.


WS 1440 with it's sleepers fully loaded. So which is correct WS or SW?

Perhaps the decal applier was dyslexic? Oh yes almost forgot, I did paint the wagon and had the decals made by a mate form the pictures found.


The two wagons "hooked up". I tried to make the top row of sleepers look as though they had dislodged or moved during transport. Then again it might have been 350pm on Friday afternoon.


The top end view.


Opposite end view.

Thursday, March 17, 2011

Shunters wagon.


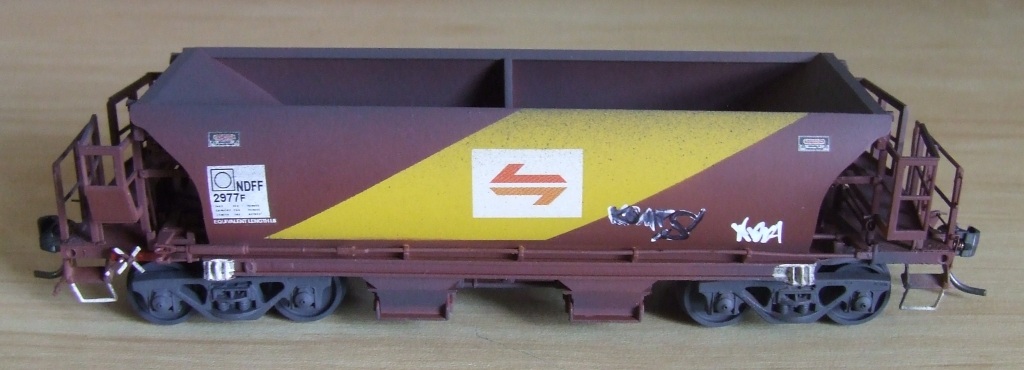
I have had a set of Columbia models NOFF ore hoppers for a while now which were part of a collection I purchased. Not being a fan of the wagon they sat in the shed for months until a mate gave me an idea. On one of his many trips into NSW photographing trains he showed me a picture of a converted NOFF into a shunters wagon. So me being always on the look out for a new challenge and some individuality I had a go at representing the wagon.


The original wagon minus it bogie's.

The first panel removed with the gas axe.


The opposite side panel removed and undercoated.


New handrails and step into the wagon. The step is a left over from an AR kits BD.


Paint completed with the rust weathering and some black and white highlights.


The opposite side of the wagon.


The completed wagon with it graffiti. Unfortunately the graffiti was a guess as I only had a shot from one side of the wagon.


The other side. Compare with the original below, but the weathering could do with some improvement.


The original.

Friday, February 25, 2011

Tarp 'er up.


Now don't go getting too excited that I have done 2 posts in as many days. This is not a sign of things to come, just catching up on the past 3 months of not putting up any posts at all.

This is my first ever attempt at Tarping up wagons, so I'm not going to tell you the best way to achieve tarped wagons, but show you my success with the method I chose.
I was gifted 4 I wagons from a friend that were constructed but unpainted so with nothing to loose what better item for me to make my first attempt.

I used the standard Dilmah tea bag. I removed the staple, string and under running water the tea leaves. Whilst still wet I was able to tear along the seam which opened out the tea bag flat, then left hanging to dry.

Once dry I cut to my desired shape, I can't remember the dimension I measured the wagon to get an estimate. Then with a white glue water mixture, the same as ballasting, I applied it to one side of the wagon.


Then folded the tarp over and did the same to the other side.


Then using the paint brush and glue mix, I folded the end of the tarp over until I came up with what looked good to me.


The end result. I found that the paint brush gave excellent control in creating the folded ends.


Then after some research through many colour photos I tried some paint samples on the scraps. Some people say that the stain of the tea is good enough but I disagree. It's too slow and you need something to fill up the gaps in the tea bag.


With a steady hand the paint was brushed on.


The tarp are now painted. The two wagons on the left are the same colour while the 3rd is a shade lighter.


The wagons now decalled and weathered. They have been weathered to represent use on phosphate traffic.


After this trial I am happy with the out come but have already thought of improvements. Next time I will unravel the string and try to use it for the tie downs. Another thought was to add some poly styrene underneath for bulky covered loads.


Thursday, February 24, 2011

Not much getting done.

It's been a very busy time for me over the last few months hence the lack of updates. Time has been very limited for me to try and get any modelling done. So here is an update of a couple of things I've been able to complete in the small amount of time I have had .

I was able to purchase a few of the missing volumes of the Brief History books late last year. So I have used them to do a lot of research into departmental traffic. I enjoy these vehicles as they are a little bit away from the normal. Above is one such wagon I9008, a friend did up the decals for me and I think they look quite alright.
I loaded the wagon with shot gun pellets to get better running. To try and disguise the weight I have thrown in a few couplers, shunters steps, battery boxes and odds and ends. Just need some more junk to hide the rest.


Simply a SEM B van with the correct numver and decals added. Again inspired from the Brief History series.


I purchased some undecorated Auscision ballast hoppers. This enabled me to have my own series of numbers away from the production run.


The graffiti was copied from some wagons I photographed in Werris creek some years ago. It was hand written using a fine point paint pen.


I was trying to model the wagons as if they had been in traffic only a couple of months if not a year. That's why the weathering is quite light.


They may have only been in traffic for a short period of time, but it would appear it's long enough for the vandals to do their work.


I'm pretty happy with how these wagons turned out as I haven't done a lot of spraying using masking tape to achieve two tone paint or lines.


Last one of the set.

Saturday, November 20, 2010

What's rollin' off the shop workbench.

I've been able to get quite a bit of modelling done recently. It's good to keep moving as it helps keep the motivation level at it's peak. It's reducing the amount of half started projects, the down side is you start more.....a vicious cycle. If you are a watcher of eBay you will see that I have been selling a few things, that's to keep the funds coming in so I can continue to model. You will also note that my posts are not as regular as some others, that's because when I sit down to post, I figure if there is time to post, there is time to model. So I guess it's about time to put up a new post on a snippet of what has been completed between my PC build and now.


I have been going through my collection of AMRM's to scan all of the articles of interest and keep them as a data base on my computer for easy reference. I came across a series of articles on the MLE and it derivatives. This is one such, NHFH slab steel wagon. The VR bought some MLE's from the SRA and converted them for steel traffic, I've never been a fan of the MLE until now. For more info read the article and see the conversion process.


Opposite side of the same wagon. I am very pleased with the out come of this project, so I will go on and build several more for my VR fleet of steel wagons.

The underframe of the same wagon. Quite a lot of extra styrene is added to build this wagon.


Another derivative of the MLE is the NCMF coil steel wagon for the SRA. Again refer to article of the info, but another good use for a MLE if you are a fan of interstate steel traffic.


Opposite side of the same wagon.


Top view showing the tie down chains.


In my hunt for new ideas I found a picture of L803. A LLV converted to departmental use for electricians. I used a AR Kits GLV that was laying around made a few mods to it and here is the end result. I know the ends aren't correct but I'm not that anal in getting things perfect. Sometimes near enough is good enough.


Note the white box on the end, I presume it is for a power connection similar to a caravan inlet or outlet not sure which.


Last one for this post is a standard NLGX nothing special about this van, but I did use it to try a few new techniques with colours and shading. I used some artists pens to give the illusion of the different shades of colour and repairs that were possibly made to van throughout it's life.


A fine paint pen was used for the white high lites on the bogie's and the 'Albury' and 'Wagga' writing on the lower section of the van. Another thing I saw in a photo and thought I would imitate.