Sunday, June 21, 2015

Little bit of Weathering

 We had a nice sunny day today, so why not take the opportunity to do a little weathering.

8629 straight from the box.

The finished product

I found an image in "Under the wires" of 8649 that had a lot of white washing running down the side so I thought I'd do my best to replicate it.

From another angle

Moree's 82 class have arrived!

Straight out of the box.

8219 from the box

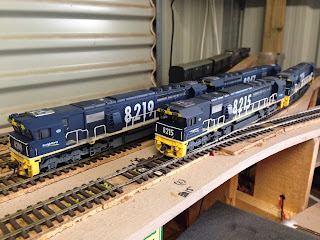
The 4 models afte being in service a couple of months.  From all of the pictures I have seen of 82 class they are rarely filthy.  They generally have dust on the roof and around the bogies.

8215 a little bit closer.

Just need to weather the 77 hoppers that run behind them now!

Thursday, November 7, 2013

It's been a long time coming......

Man have the last 6 months been busy!  Due to work being so crazy lately it has obviously affected my modelling pursuits and as such the layout has suffered.  Below is about the only progress that has been made due to my lack of spare time whilst at home.

I decided to get a bit more of my scenery completed.
This time it was a cutting through some stone.

The above stones were cast with plaster cast from Woodlands Scenics rock moulds.

After shaping the polystyrene, it was coated with plaster cloth.

Next the precast rocks were attached to the plaster cast with extra plaster.

Then they were painted flat black all over.

Then washed with a diluted grey, not as diluted as water but quite runny so it would only sit in the cracks.

This process was repeated several times untill I was happy with the result.
At this stage it has had some light brown dry brushed into areas to break up the colour a little.

The finished result.

Add a bit of dirt, some bushes, rocks and trees to complete the scene.

I got a bit excited and painted the backdrops.  I was amazed how much difference painting the entire back scene in the room made the entire place light up!

Hopefully I can get in a bit of free time to attempt some clouds?

Tuesday, June 4, 2013

Not just a one trick pony!

I got a hold of  a couple of trucks that I wanted to convert into grain trucks.
The first one was from the US, mini metals?  The second from Europe a Busch brand.


This truck was given to me by a friend to play with.
I built a tray and grain bin from pictures of several truck similar on the Internet.


The completed unit prior to painting.


After paint and a little weathering.


Pressed into service.  Thankfully it didn't break down on the way to the silos!


Another truck of my own.
I removed the tipper tray it was supplied with.


New mudflaps installed.


The completed grain bin.


It just needs a lick of paint to stop the rust setting in.

Tuesday, May 21, 2013

Tight arse tip!

Another rant on scenery I know but hopefully his one will save you a bit more cash.  I did some searching and trials on how to make my own grass tufts instead of buying the ones that cost as much as 3 bags of static grass.  Below is the method I have found to be useful so far, but it could be improved on as time goes by.  You could alternatively do it in place, you would need a good bag less vacuum to reclaim the excess static grass for a second use.  The only problem is you will probably pull up other scenery flock and have a mixture of grass and flock.... 


A standard piece of alfoil.
Drop a few dabs of glue here and there to make your random bases for the tufts.
(You need an metal base to conduct the electricity!)


Next, coat the sucker with static grass.
I used a mixture of 4.5 and 6 mm long dry grass.
Using the 4.5 seems to fill out the centre a bit better and give it a full and inconsistent height in the grass.


A good thick coating of static grass is what you want, don't be stingy as you get what doesn't stick back later.


The finished product.
After a good 24 hours drying time you can remove the excess static grass for another reuse.
Then you use you finger nail to pick and then peel off the tufts.
(Don't know why this picture loaded upside down?)


The finished product ready to glue down.


Some tufts glued in place with a little more white glue.


Again another area where the tufts have come to use.  You are gonna need a million of these bad boys so get to making them!  Perhaps a good family bonding time with the kids, if you have the patience......

Friday, May 10, 2013

Cheap Trees

Just like everyone else that models an Australian rural scene you need gum trees, lots and lots of gum trees.  So me being one who is hard pressed for time and impatient to see a scene come to life rapidly, I didn't want to have to make the trees individually.  So laziness being the mother of all invention a light bulb sparked in my head!  Buy some of those crappy trees from eBay and try to dress them up like a gum tree using the same methods as twisted wire and no more gaps.


The tree as purchased from eBay.  Not at all like a gum tree, but the basics are there.  Twisted wire trunk and foliage to build on, to better represent an Aussie gum.


Step 1 was to mix up a batch of Selleys no more gaps with a grey paint.  Try not to mix in the grey consistently as you want a little of the white to come through in the final colour.


The trees with their new bark.  By not having to twist and solder the branches you save a heap of time.


The last step was to add a lighter colour of foliage to the original foliage supplied with the tree.  I used a Selleys spray on adhesive and then lightly sprinkled on a fine foliage from Noch.  I wanted to leave the original dark colour for depth, you could however paint it a different colour.  This would have to be done prior to painting the bark, otherwise you'll have green bark!


You can smash out a heap of trees after about an hour.  The most time consuming part is applying the grey no more gaps.


A few new trees planted around Boggabilla station.  While they are no means huge in height or perfect, but I can live with the fact they cost about $3 each and only took 3-4 minutes each to make.


The view from the opposite end.  I will make a few of my own trees that are monster like in height and a little more life like, as the maximum height of the ones here are 12 cm.  For now though these are serving the purpose.


A close up of one in the creek.


Again, a couple in the creek.

Sunday, March 17, 2013

Having another crack!

I had purchased some more static grass at the start of the year and due to me never being home of late have not had a chance to give it a try.... until now!

 I wanted to do it a little differently to the first attempt as I thought the grass I had used looked too green.  The grass I purchased this time was a lot dryer looking, and I wanted the green to only look like short grass under growth.  I used a sieved HEKI brand flock glued to the dirt for a start.

 Then applied the static grass over the green flock.
The grass is a mixture of 4 and 6 mm long fibres to give an uneven looking growth.
The 4 mm fills in the holes quite well.  Again I have glued yellow flower clumps to the top for some weeds.


I wanted to have tall green grass along creek bed.  This was achieved by using the Woodlands Scenic fibres that are about 80mm long.  I trimmed them to a length that I was happy with and applied a seam of white glue along the areas of the creek bank where I wanted the tall grass.


A near finished scene, just awaiting on some trees and then I will also add a few other bits and pieces.  Perhaps some animals, powerpoles, logs, rocks, etc.


Again from a different angle.


The wheel tracks were made by waiting for the glue to dry, then with a small stiff paint brush wiping the fibres back off the scene.  I will probably do this in other areas as again I am not happy with the grass having a consistent height.  I will also add some clumps of grass to break up the evenness of the grass. 


Final shot.
Hopefully I will have a bit of time at home over Easter to get some more completed as the scenery is really bringing the layout to life.  It's helping with the motivation as I can now see a semi finished product, plus it's nicer to watch a train crawl trough a scene than polystyrene!