Saturday, August 28, 2010

Improving 3507

As mentioned in the last post I would do a solo post on the 35 class showing the modifications I had made. I found a photo of 3507 in the Alco DL531 book, this was my motivation. The AR Kits model is a generic version, or perhaps an as delivered version of the 45 class, so there were a few changes to be made.


The original 35 (45) class straight from the box.


After disassembling the model and close study of the picture, it was noticed that it had twin marker lights. This was easily achieved by removing the moulding of the single light box (right) with a sharp hobby knife and attaching the supplied twin marker light and touching up with paint.


The same was done to the front. Unfortunately I didn't take as many photos of the process as I thought I had. I also glued in the number board lights and headlights at this time. Another problem I found with the model is it doesn't have directional lighting. This was easily fixed by removing the old bulbs and adding a led light fitting. Another problem for me was the amount of light coming through the shell/body. This was an easy fix by simply painting the interior of the shell with black paint.


The amount of clearance between the side frames and wheels was another mod I wanted to make. This was found in the AMRM article on how to improve the 45 class. A very time consuming but easy and noticeable improvement. Just disassemble the bogie's and remove the area shown above. This amendment requires you to also move the wires soldered to the pickups, because if you don't the wheels don't move freely.


The bogie on the left is the result and the one on the right the original. I think it looks much better and gets the brake shoes a lot closer to the wheels.


The end result. Brass hoses were added to the pilots along with Kadee 25 couplers. With the cab I removed the piece of plastic and two centre window glass to more represent sliding glass windows. They were also touched up with black paint around the edges and the windows tinted with a nikko pen from the inside. Crew were also added for realism. Before putting on the hand rails around the roof I touched them up red paint where they are fixed to the body. You may also notice the QR logo on the hood. This is clearly show in the photo from the book.


The view from the long end. They weren't the hardest or most technical mods ever done but they were very effective for creating a more representative model.


Monday, August 16, 2010

Everything is made to be broken!

Some friends of mine were driving from Toowoomba to Sydney for the Annual modellers convention. They always like to stop at various train locations along the way. One such location is Werris Creek. I had received an email from one of the men a week or so earlier saying that a list of 48's had been towed from Narrabri to Werris Creek ready for scrapping. Well this was to be correct. The following is some images of the beloved 48's being eaten by the scrappers excavator.

The heart out of an unknown 48.


The cabs of 4855 and 4879.


Another unknown cab.


The hungry excavator making lite work of destroying our beloved 48.


4885 awaiting the same fate. Also the heart from a sister unit and what looks like a container flat at front of picture.


The cab of 4879.


48149 watching it's sister being eaten up. 4876 in the line of destruction.


More 48's wait their turn in line.


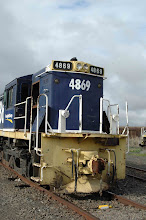
Last but not least my favourite 4869. Their are at least 13 48's in total receiving the same treatment. 4855, 4860, 4861, 4869, 4866, 4873, 4874, 4876, 4879, 4880, 4882, 4883, 4885.
I guess there is a good modelling idea for all those who own powerline 48 class and don't know what to do with them once their TrainOrama 48 have arrived!

Sunday, August 8, 2010

More Free Time!

After finishing my chores around the house today I was allowed to have some play time! So what better thing to do than duck into the shed, fire up the air compressor and get into some long overdue weathering. Today's goal was to try and get the bunch of Tuscan locos I had waiting around weathered so I can put them on eBay. These were some locos I picked up from a deceased estate, they are not my era, but were too good a price to refuse. I haven't weathered much in the way of the Tuscan era so it was a learning curve for me. Also very easy as there are heaps of photos around to use for inspiration.


The end result of a couple hours weathering. Unfortunately the photos don't do them much justice.


3507 is an AR kits loco in Marlboro. It is the only loco I will keep as I have wanted one of these for some time and you don't see too many others with them. I plan on doing a post on this loco as I have made quite a lot of little modifications to make it look more like a 35 and less like the as delivered 45.


4705 is from the TrainOrama family. As we all know high in detail, it just needed to look more like a model and less like a toy.


44203 is a DJH kit that I picked up for an absolute steal. It was built and painted all I had to do was give it a light touch of weathering and that finished this model nicely.


4856 from the Powerline family. Just fitting the couplings as I write this blog.


4912, again from the Trainorama family.

Friday, August 6, 2010

Half Days!

Fridays are Great! I only need to work half a day which means I get home after 1pm.
If it is sunny this can mean a good afternoon in the shed with the airbrush, painting or weathering some models.(Depending on the family)
Today I decided on some weathering. This was to try and reduce the amount of projects I have on the go. A very productive afternoon today meant that I got about 15 wagons and 2 locos weathered. This post will feature a couple of the wagons. I have saved up one of the locos for a post of its own which is soon to come. Here is a brief glimpse of today's out come.
(Remember to click on pictures for a bigger view.)


NPJH 35611 Limestone hopper. You may remember it from a previous post.
The graffiti was done by me with a paint pen from the art shop.

Same hopper, other side. The graffiti art came from photos of other limestone hoppers I have.


NPJH 35604. The dark patches on the hopper represent repairs and repaint.
This was done with a blue nikko, also purchased from the art shop.


Same hopper other side.
The white streaks are from the previous L7 decals, which have now been covered by the new owners, freight corp. A very common theme on these wagons in service.


NPJH 35653. SRA red with heavier graffiti. Again done by hand from photos of limestone hoppers.


The other side, looking like it may have spent quite some time in a siding to have copped this amount of abuse.


NPJH 35689. SRA red again with repair patches on its sides.


Opposite side with similar repairs. Again done with a red nikko from the art shop.


FBW 1185. Another blast for the past. Finally complete!

Wednesday, July 14, 2010

More Wagons completed!

Finally another couple of projects finished!
You may remember from one of my first posts I was building these three GLX vans.
Well I have finally had a chance to get them completed!
Travelling away with work is making it very hard for me to model lately and even harder to get some posts up. So here is an update.


Step one to weathering these models was brushing on some rust colour and then giving it it a few seconds, then putting on a tissue and taking away most of the colour. The end result is shown above.

I then brushed on some red around the springs of the bogie's.
I also added some very thinned down grimey black with a brush around the bogie's.


This is a close up view of the bogie's.
I didn't want to get to heavy on the weathering as sometimes I think there can be too much.

Another of the wagons showing a different weathering arrangement. This time focused more around the hinges of the doors.


I noticed in the picture of this van that it had 'Newcastle' written three times on the lower section of the van. I imitated this with a very fine point paint pen.


The wagons were all hit with the grimey black from the airbrush to dull down the rust and blue paint on the wagon. It also received a dull coat which sealed the weathering to the wagon.
This shot shows how it has dulled down the white lettering of the hand written 'Newcastle'.
I probably went a little heavy with the rust, but this exercise was not to match the wagons exactly but to use them as a bit of a guide and try something different.
The last wagon. Again not exact but a close representation.
Maybe after a few more attempts my skills will improve, but it is all a learning curve.
Overall I am happy with the out come as I have not built and paint the stock standard gunmetal grey louvered van with grimey black weathering. They are a unique model.

Thursday, May 27, 2010

Thank goodness for the footy!

What better reason do you need to turn off the TV and get into some modelling. Tonight's project will be to turn this Hi-Rail NPBF 32110 AFL hopper into something a little more realistic.

The new hopper straight from the box.

Step 1: Apply rust unevenly to the side of the hopper. This was done using a very shabby paint brush with a small tip that has never been cleaned. I don't clean it so as to get a hard brush with random bristles which gives a streaky look. Note: handrails have been removed, same as original.


Other side of hopper and roof. I like to work from top to bottom, this is to try and simulate the rain/water run off on the wagons side.


Step 2: Paint the hand brake, release and hatch door openers red. If you look at the original it is the same. It's great to use original photos for weathering, this shows you many variations which people don't use. It helps a bit to get some individuality.


Side on view of the red paint applied.


Step 3: Using a second colour, in this case a creamy yellow. Add a little around the heavier areas of rust to simulate the different shades of rust.


Opposite side of wagon. This is similar to a dry brush method. Only apply a little bit of paint to the brush and paint areas. Once you have finished one side go back to the first patch and hit it again without paint. This thins the paint a little more. It can give you a thick and thin patch depending on how much paint you take off on your second run.


Step 4: Same brush uncleaned, only wiping of excess paint, paint areas to simulate diluted fertilizer running down hopper side. This time dip the brush in paint and then thin as you apply to the hopper.


Opposite side. This is done a little randomly but with some thought.


Step 5: When doing the roof area, while the paint is still wet i added ground up white chalk to give the caked on texture of the fertilize build up.


Step 6: Hopper doors need to have white applied. Don't go too crazy as unless it derails you won't see it anyway.


Step 7: White paint with chalk added while wet. A little rust was also applied here.


Step 8: With the airbrush spray underneath the hopper, especially around the hatches.


A view of the roof after spraying. Spraying the hopper just removes the new look of the rust colours and any other original paint shininess.


A view from the side.


Step 9: Back with the rust and brush touch up a couple of areas again with both colours. You will see the difference between this hopper and the one above.


The other side of the wagon. Last jobs was to airbrush wheels with grimey black to remove new look. Hope this may help or inspire some of you guys.